Der Rüchenbrecher Baking and texturing
- psjay300
- Apr 8, 2022
- 4 min read
At this point, both the high and low poly versions of the asset were ready for exporting and baking, but before baking there were to considerations to be made in terms of the baking parameters.
The intention for the resolution in the final textures was to produce them in 4k, so the resolution for the baking process was set appropriately to include that, as well as setting the bake parameter for the channels to be PBR metallic, roughness, AO.
The results of the initial baking process proved not to be ideal as the components for the asset were combined in Maya before export. There were inclusions in areas where faces were close together, which was intentional in places but caused the baking issues. The way that this was fixed involved not combining but grouping the components in Maya, then setting the 3D gizmo to the same centre point for all separate components. Finally, all of the grouped components were assigned to a single animation location marker so that they would not bake out in relation to each other, but in relation to the marker. Something that I picked up from a peer. Don't know how it works but the results were desirable in the bake results.


Bake results showing no inclusions or bake errors.
After checking the bakes and maps that were generated, I kept things simple in terms of texturing and in such a way which would compliment the sculpted details from ZBrush.

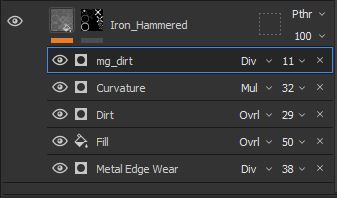
As seen above, the iron boss in the centre of the shield features a hammered and worked effect. This was created by combining the Iron Hammered base material in substance painter with some generators. By changing the associated generator parameters and the blending modes, the sculpted details were preserved to achieve the desired effect, then finished by switching off all channels other than colour, metalness and roughness, which were also adjusted to finalise the hammered metal effect.
This new hammered iron texture was duplicated and assigned to all other metal components of the asset.
The same process was followed for creating the wood texture, where American_Wood_Cherry was used as the base. Again, generators were added to preserve the and work with the sculpted details which emphasised the crevasses of the surface, in which the curvature generators were especially useful to give contrast in the depth of the sculpted details against the base colour. The only difference between the front and back of the wood was an extra layer for paint for decoration.


Lastly the leather was generated. When observing leather, it's often found that the edges of a leather strip that have been worked using traditional methods, are burnished to create a seal to protect from weathering.
This was planned during UV unwrapping as the front, back and sides of this component were unwrapped to create separate UV's with the intention of creating that burnished effect.

As seen in the layers of the material, there is a separate fill and mask for the burnished effect and the tanned leather effect for the rest of the component. They were blended together using generators and colour that matched the burnished edge to flow into the rest of the leather strip, giving the impression of rubbing some kind of oil on the edge of the leather strip which has seeped into the grain to seal the strip against weathering and wear and tear.
There is however a big problem with this technique as the beauty shots turned out great, but the live view in Marmoset Viewer, clearly shows a difference between the two UV's.

Beauty shot generated in Marmoset shows a smooth blended transition from the burnished edge of the leather strip to the front faces.

UV seam picked up in the live view in Marmoset Viewer.
It seems that the applied techniques worked for beauty shots, but not so well when viewed live. This was noticed after posting so the issue was analysed and a solution created. I could stitch the UV's together, export again and re-bake, apply all of the existing textures. For the leather there should be 2 layers of the same texture where one of them is a slightly darker colour, placed underneath the lighter coloured. It would be better to set the layers up like this and paint in the underlying layer with a soft brush to expose the darker colour. This way there would be no UV seam where the burnished edge transitions into the texture of the leather.
Summary
This short project has provided a lot of learning in the areas of sculpting, retopology and texturing. By using the sculpted details as a texture base within the normal map, I've realised just how time efficient the texturing process can be and just how much detail can be preserved and used for creating effects and impressions in the texturing process, especially when combined with what is already available in terms of base materials.
When creating the sculpted texture base I had concerns with creating an organic look on an asset that is meant to be hard surface. It was suprising and enjoyable to apply what was learned from research for creating sculpted wood, metal and leather. Continuing to use that process of physically sculpting on a surface in layers within ZBrush has made my work a lot more time efficient and open to fast iterations when needed.
Retopologising the asset was a challenge but I realised that the process can be much easier with a lot less polygons used when retopologising components of an asset separately. This practice can be bought into character creation where dressing character includes wearable props such as weapons and equipment unique to characters.
There are many things that have been learned and applied here and mistakes made. Although the leather handle is a position that wont be viewed often from a players perspective and probably not even noticed, I find that because I had the intention of creating a burnished edge, it should have been done properly with no errors. From this I have learned that blending textures along a UV seam does not guarantee a smooth transition of the texture across 2 separate UV's. Things like that should be addressed by blending layers in areas where there are no UV seams.


Comments